Introduction to HTML Padding
Generally, padding is the space between the things for anything the same as in the HTML refers to the space between the HTML contents and its borders. The HTML padding is also a property for using the web pages more attractively and highlight the web sites. It also some types like padding-top, padding-left, padding-right, padding-bottom, etc. we can align the words or text in similar type padding formats. The padding creates extra spaces within the HTML elements, and the also margin creates extra space for the HTML elements. We also use the CSS styles, and their properties use for all the padding areas.
Syntax:
Each of the HTML tags has its own attributes and properties of the elements. Likewise, syntax also differs, and they will use for all of the other HTML tags if the user requirements need. Below is the basic syntax of the padding elements in HTML.
<html>
<head>
<style>
.sample
{
Font-size:1 px;
Background-color:green;
Margin:28px;
Padding:30 px;
}
</style>
</head>
<body>
</body>
</html>
The above syntax helps create the sample web page and will use the padding styles in the CSS styles for the head section in HTML. Based on that, the syntax will vary if we use it in the other sections and tags in the HTML.
How does Padding work in HTML?
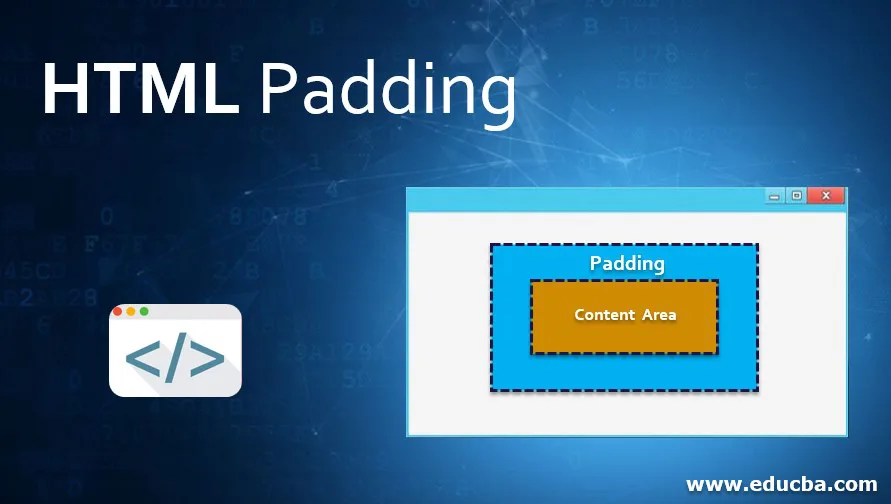
Compared to margin, padding is the extra space created inside some HTML elements but margin created outside of the HTML elements. Each of the elements like padding and margin they refer to the box models that are padding, margins, and borders all combine with the box moels of the HTML containers. In that model, middle portions of the areas used for HTML contents, that is, text or images, videos, etc., surround with some padding, margins, and borders if the user needs for the customized development in the web pages.
We won’t use all these as necessary, but it’s very helpful to remember the box model is applied to every tag or element on the web pages. Some CSS styles and properties use to allow a string of values that is replaced with the number of properties, and they represented with values separated by using spaces.
The padding in the box with inside margins and borders areas and outside the HTML contents area, padding property, is used to specify the uniform padding style in the box container. Three or foursome values are specified independently based on our declaration in the codes with client requirements. Popular Course in this categoryHTML Training (12 Courses, 19+ Projects, 4 Quizzes)12 Online Courses | 19 Hands-on Projects | 89+ Hours | Verifiable Certificate of Completion | Lifetime Access | | 4 Quizzes with Solutions
4.5 (6,502 ratings)Course Price
₹6999 ₹41999
View Course
Related CoursesBootstrap Training (2 Courses, 6+ Projects)XML Training (5 Courses, 6+ Projects)CSS Training (9 Courses, 9+ Projects)
Padding concepts have some possible values that should be used for calculating the lengths and note that it should not be a negative one; also, calculate the percentage that includes the box width, height and it also not include the negative values. We can use padding on the image side for the web pages in HTML with the help of creating buffers between the images and the data streams like HTML contents. It is used for giving the images like little breathing room so that only they are n’t jammed in either text or other images.
I suppose we use the images on the left side of the web pages image and the data content is closely attached, and there is no distractingly close to the images, but when using the same images in the right panel, the padding creates a buffer between the images and the text it will be helpful for pleasant reading experience in the user perspective. We can also add the padding in the image canvas using edit operations like HTML editor with some style attributes and switch to the rich text-editors after the user selects the images. Based on the user or client instructions, selective padding like for example, 10-pixels border is added to all the sides of the images which we select or upload the image contents in the web pages; also, we can add the padding selectively by using some padding styles like the padding-bottom option to padding-right based on the user requirements.
4 Padding Values
We can use padding in javascript functions to create and re-size the border styles or padding styles automatically after calling the javascript functions in the HTML codes. Generally, padding property sets or returns the padding of the HTML elements that property takes from a single value up to four values; we will discuss each of the padding values below.
- Single value: Example like div{padding:12px}-all the four sides of the HTML contents will have a padding value like 12 px.
- Two values: div{padding:12px 13px}-the top and bottom padding will be the 12px,the left and right paddings will be 13px.
- Three values: div{padding:12px 13px 14px}-the top padding will be 10px,left and right padding is 13px and bottom padding is 14px.
- Four values: div{padding:12px 13px 14px 15px}-top padding is 12px,right padding is 13px,bottom padding is 14px and the left padding will be 15px.
Examples of HTML Padding
The examples of HTML Padding is given below:
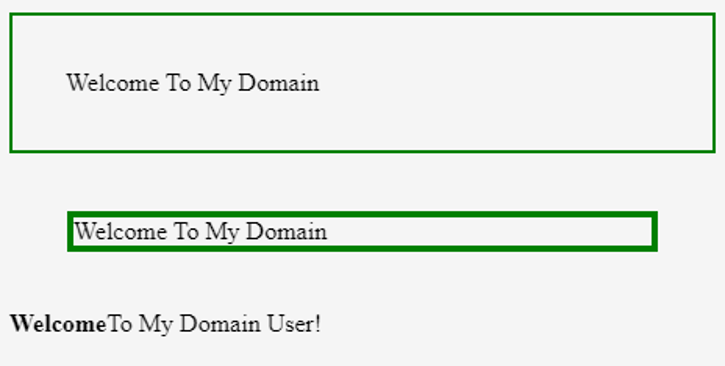
Example #1
Code:
<html>
<head>
<style>
.sample {
border: 2px solid green;
padding: 34px;
}
.sample2 {
border: 4px solid green;
margin: 37px;
}
</style>
</head>
<body>
<p class="sample">Welcome To My Domain</p>
<p class="sample2">Welcome To My Domain</p>
<p><strong>Welcome</strong>To My Domain User!</p>
</body>
</html>
Output:
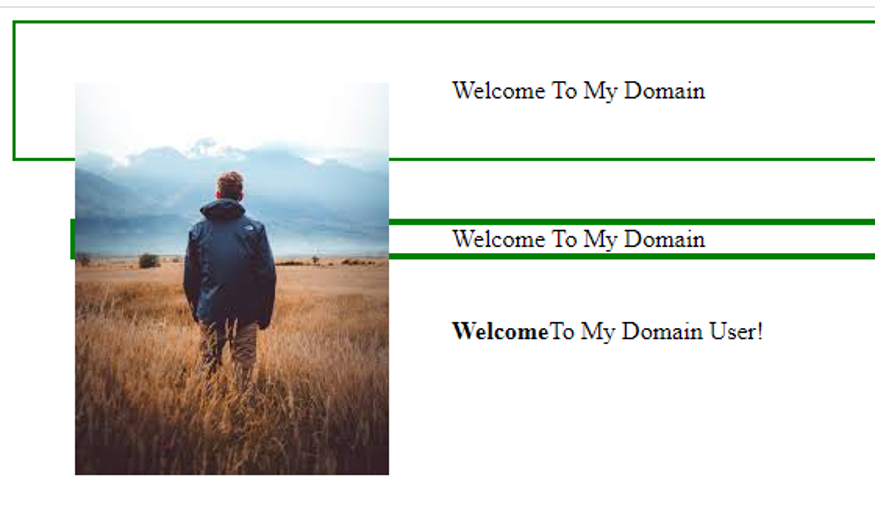
Example #2
Code:
<html>
<head>
<style>
.sample {
border: 2px solid green;
padding: 34px;
}
.sample2 {
border: 4px solid green;
margin: 37px;
}
</style>
</head>
<body>
<img src="download.jpg" style="padding:33px;float:left">
<p class="sample">Welcome To My Domain</p>
<p class="sample2">Welcome To My Domain</p>
<p><strong>Welcome</strong>To My Domain User!</p>
</body>
</html>
Output:
Example #3
Code:
<html>
<head>
<style>
#sample {
border: 2px solid green;
padding: 34px;
}
.sample2 {
border: 4px solid green;
margin: 37px;
}
</style>
</head>
<body>
<div id="sample">Welcome</div>
<br>
<button type="button" onclick="samples()">To My Domain</button>
<script>
function samples() {
document.getElementById("sample").style.padding = "2px 3px 4px 5px";
}
</script>
</body>
</html>
Output:
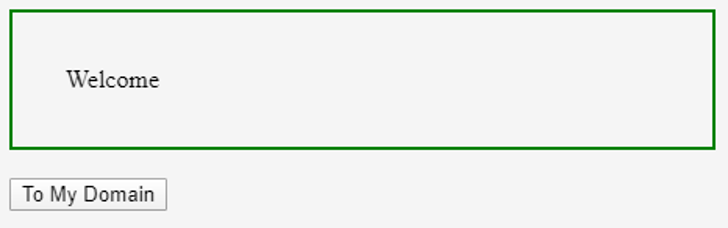

The above three examples first example is the basic example for the padding concept; in the second example, we will add additional images in the web pages using padding styles. The final example is we use javascript functions to set or resize the padding styles automatically.
Conclusion
We already discussed some HTML concepts in real-time scenarios, whichever we are using HTML tags in web pages, not only in web mode but also on user compatibility; it will accept the mobile (both android and ios) modes based on user requirements.
Recommended Articles
This is a guide to HTML Padding. Here we discuss the basic concept, how Padding works in HTML, and the respective examples. You can also go through our other related articles to learn more –