Introduction to Arduino
Arduino is an open-source software and hardware company, that designs and manufactures single-board microcontrollers and kits to build digital devices. The Board developed by them are termed as Arduino boards that are capable of reading inputs like – dept info using radar, light on a sensor, press of a button, etc. can convert them into an output like activating the led light, motors, buzzers, etc. There are different variants of the Arduino board available in the markets e.g. Nano, Uno, Atmega, etc. each one of them vary in shape and sizes. It also provides a Software IDE for their boards, which helps the developer to program the board in Language, this IDE also gives the liberty to the user to provide input instruction directly from the system.
Types of Arduino
Let’s see a few different types of the board provided by them itself:
- Arduino USB: UNO, Duemilanove, Extreme, NG 240
- Bluetooth
- Serial
- Single-Sided Serial
- Mega
- Lilypad
- Nano
- Mini
- Mini USB Adapter
Arduino software uses Arduino Programming language which is C based to write the code. Since the programming language is C based, the difficulty of writing the program in assembly language is removed. As the software coverts the C based program into assembly code internally and then uploads it to the board. Along with the code editor, the software also consists of a compiler, an uploader, libraries for the peripheral devices.
How Arduino Works?
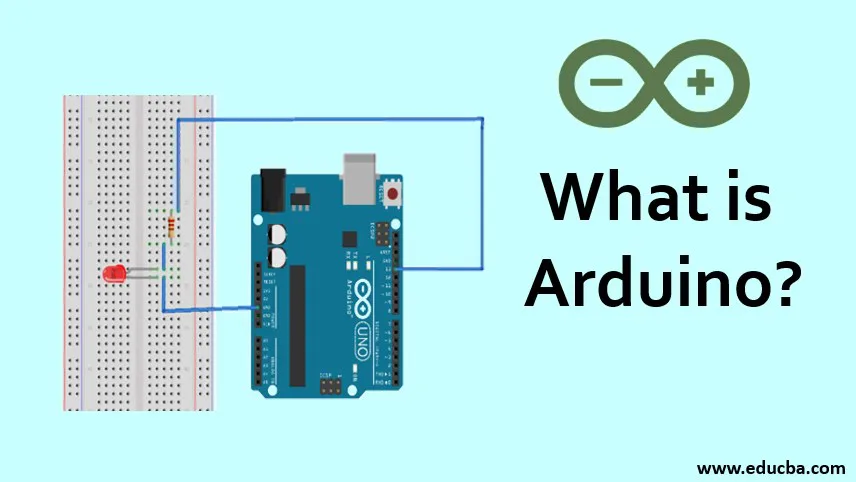
We will see the working by blinking a small LED.
Components Required: Arduino UNO, LED, Jumper wires, Breadboard and a 1k resistor
Working
Following are the steps involved in the blinking of the LED’s using Arduino Popular Course in this categoryAll in One Software Development Bundle (600+ Courses, 50+ projects)600+ Online Courses | 3000+ Hours | Verifiable Certificates | Lifetime Access
4.6 (3,144 ratings)Course Price
₹8999 ₹125000
View Course
Related CoursesWindows 10 Training (4 Courses, 4+ Projects)JWS Java Web Services Training (4 Courses, 11 Projects)Java Training (40 Courses, 29 Projects, 4 Quizzes)
Step 1: Connect the components as per the circuit diagram and then connect Arduino UNO to the system using the USB cable.
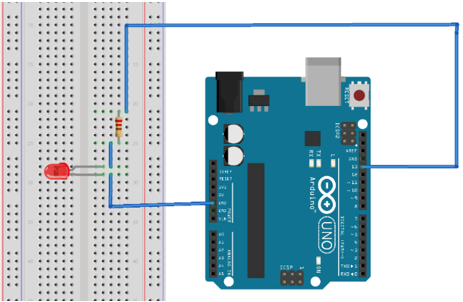
Source Link: https://create.arduino.cc/projecthub/rowan07/make-a-simple-led-circuit-ce8308
Be sure of the negative terminal of the LED, the shorter leg of the LED near the head indicates the negative terminal.
Step 2: Download Arduino IDE in your system from https://www.arduino.cc/en/software
Step 3: Setup Arduino IDE: Open IDE and go to Tools -> Boards and select Arduino UNO. Then go to Tools -> Ports and select the port at which UNO is connected.
Step 4: Coding the logic: Implementing the LED code is simple. All the code of Arduino consists of majorly two functions:
Code:
void setput(){
}
Void loop(){
}
Void setup is called when the Arduino starts and the void loop keeps on iterating in an infinite loop until the power is turned off.
Code to blink the LED is as follows:
Code:
void setup(){
//put your setup code here, to run only once:
pinMode(13, OUTPUT); // define pin 13 as the output
}
void loop(){
// put your main code here, to run in a loop:
digitalWrite(13, HIGH);
delay (1000); // delay for1s
digitalWrite(13, LOW);
delay (1000);
}
Step 5: Compiling and Uploading: After writing the code you can either click the compile button and then upload it, or you can directly click the upload button, as it will compile the code and it no error is there it will upload it to the Arduino. In our case, if the code uploads successfully then you should get a message like:

If your connection is correct, then you can see your LED blinking ON/OFF at an interval of 1 second.
Features and Applications of Arduino
The features and applications are mentioned below:
Features:
- It is opensource both in term of hardware and software
- It can perform serial communication with the computer using USB.
- It only needs 5V to power up
- It can work with Digital and Analog signals, sensors and Actuators.
- The recommended input voltage is 7-12V while the operating voltage is 5V for most of the Arduino boards.
Applications:
Following are the few popular application:
- For Easy Prototyping
- Controlling Motors
- Robotics and Control System
- Designing Basic Circuit Diagrams
- Home and Industry Automation
- Standalone Projects
Advantages and Disadvantage
Below are the advantages and disadvantages:
Advantage
- Inexpensive: Compared to other microcontrollers platform boards are inexpensive. The least expensive can be handled by hand while the pre-assembled model is less than 50$.
- Cross-platform: Most of the microcontrollers are limited to windows while Arduino code can run on Linux, Mac, windows.
- Common IDE for all the Arduino Boards: For all the different boards launched by the Arduino we can use Arduino IDE to program and upload the code. There is no need to install any other software.
- Opensource: It is published under open-source hardware, so circuit designers can use it to implement their modules.
- Large Community Support: Arduino community Is very helpful in resolving queries and providing solutions and codes. There is a large number of projects at Arduino Home which is available free of cost.
Disadvantage
- Limited Memory and Processing Power: Arduino is not much powerful when compared to microprocessors like Raspberry pi. So, there can be scenarios where opting for a micro-processor like Raspberry pi is a better option over micro-controller.
- Not optimized for specific use: Arduino is meant to fulfill multipurpose. It is more for prototyping projects rather than being used as a specific PCB.
- Ease of Use: Yes, ease of use is a disadvantage as well, using it for the electrical project will result in no understanding of the AVR microcontrollers.
- The Debugger is not available: The IDE doesn’t have a debugger due to which sometimes it becomes hard to debug long codes.
- Internet Connectivity: Connecting the internet is not impossible but its also not easy as it has shields and libraries.
Conclusion
Due to the limit on the size, we didn’t discuss the different types of Arduino boards but even though In this article we saw what is it along with their advantages and disadvantages. We Understood how to write the first code in it. By now you should be confident enough to write the program and use them in your module.
Recommended Articles
This is a guide to What is Arduino? Here we discuss how Ardunio works along with the types, applications, features, and advantages and disadvantages. You can also go through our other related articles to learn more –
ALL IN ONE SOFTWARE DEVELOPMENT BUNDLE (600+ COURSES, 50+ PROJECTS) 600+ Online Courses 3000+ Hours Verifiable Certificates Lifetime AccessLearn More0SHARESShareTweetSharePrimary Sidebar
Computer Tutorial
- Computer Basics
- New Technologies Of Computer
- Application Of Computer Graphics
- Types Of Computer Architecture
- Types Of Computer Software
- Components Of Computers
- Computer Input Devices
- Line Drawing Algorithm
- SOAP Web Services Interview Questions
- Web Services Interview Questions
- Microservices Interview Questions
- What Is Windows 10?
- Windows 10 Desktop Mode
- Windows Commands
- Windows Interview Questions
- Windows Networking Commands
- Windows Operators
- Windows Server Interview Questions
- Introduction To Windows
- Top Windows Phone Apps
- Windows Monitoring Tool
- Productivity Tricks For Windows 10
- Computer Network Advantages And Disadvantages
- Computer Network Interview Questions
- Introduction To Computer Network
- Metropolitan Area Network
- What Is Embedded Systems
- Components Of Embedded System
- Embedded Systems Security
- Types Of Computer Network
- Types Of Computer Operating System
- Evolution Of Operating System
- NAS Storage Device
- Windows Administrator Interview
- Types Of Communication Network
- What Is Automata
- Types Of Mainframe Computers
- Types Of Computer Hardware
- Types Of Sensors
- What Is Server
- What Is RPC
- What Is Microservices
- Types Of Computer Virus
- Types Of Computer Keyboard
- Types Of Motherboard
- Sensor Device
- What Is Computer Graphic Design
- Computer Architecture Interview
- What Is Computer Science?
- What Is Bluetooth?
- What Is VLAN?
- Types Of VLAN
- Types Of LAN
- How Does LAN Switches Work
- What Is VLAN Network?
- What Is Native VLAN?
- Switching Modes
- What Is Storage?
- What Is Object Storage?
- What Is Block Storage?
- Block Level Storage
- Cordova Local Storage
- Threads In Operating System
- What Is Gateway?
- What Is Ethernet?
- What Is Virtual Machine?
- What Is A Trunk Port?
- VPN Applications For Android
- What Is A NAS Drive?
- What Is Ring Topology?
- Point To Point Topology
- What Is Mesh Topology?
- Extended Star Topology
- Token Ring Topology
- Physical Topology
- What Is A Hybrid Topology?
- Hybrid Network Topology
- Star Network Topology
- Star Bus Topology
- Zariski Topology
- Ethernet Topology
- Logical Topology
- Partial Mesh Topology
- Types Of Computer Cables
- Types Of Computer Language
- Features Of Operating System
- Functions Of Operating System
- Multithreading In Operating System
- Ethernet Frame Format
- Types Of Memory In Computer
- What Is Heap Memory?
- Cache Memory
- Cache Memory Types
- Register Memory
- What Is Register?
- Types Of Registers
- What Is Arduino?
- Arduino Operators
- What Is ISCSI?
- Computer Science Interview Questions
- Types Of USB Ports
- What Is Port
- Daisy Chain Network
- What Is A Monitor?
- What Is Printer?
- Types Of Printers
- What Is WPS
- What Is Mouse?
- Types Of Mouse
- Types Of Socket
- Transmission Modes
- Computers Output Devices
- Memory Units
- Secondary Memory
- What Is Memory Card?
- Types Of Memory Cards
- What Is Intranet?
- Central Processing Unit
- Computer Ports
- What Is CPU Register
- Types Of CPU
- Types Of Compact Disc
- What Is A Motherboard?
- Types Of LED
- Types Of Processor
- Types Of Primary Memory
- Helpdesk Tool
- What Is Optical Fiber?
- Windows 10 Creation Tool
- Unguided Media Types
- Microcontroller Architecture
- ARM Architecture
- What Is NVME?