

Introduction to Select Tag in HTML
The Select Tag in HTML is a provision for enabling a selection feature from the list of option, such as a drop-down menu or a multiple selection menu. It is a tag that can be used inside the form of the HTML code used for creating and implementing a web page. The syntax goes like ‘<select><option> Value </option><option> Value </option>….</select>, where each item in the list will be enclosed by the option tag, and select will allow the user selection feature. In order to facilitates other selection methods like opt group and multiple selection, <optgroup> tag can be used inside the <select> tag and <select multiple> can be used instead of the <select> tag respectively.
Syntax of Select Tag in HTML
Select tag can used <select>…</select> tag.
The syntax for this tag is as follows:
<select>
<option> Value  </option>
<option> Value  </option>
</select>
The above syntax <select> tag creates a selection list with the options menu to select any option from the list. By default, it will display the first option as the selected option.
It’s also possible to select multiple options using the <select> tag in the selection list. This syntax is the same as the normal <select> tag; the only difference is using multiple keywords; it will allow the user to select multiple options from the list.
It will be as follows:
<select multiple>
<option value=” ”> Content Name </option>
<option value=” ”> Content Name </option>
<option value=” ”> Content Name </option>
<option value=” ”> Content Name </option>
</select>
One of the most important uses of the <select> tag is to create an option group into the list. It will create multiple options as a group, and the heading of the group will be displayed in bold heading.
The syntax for this is as follows:
<select >
<optgroup label  = ”labelname”>
<option value=” ”> Content Name </option>
<option value=” ”> Content Name </option>
<option value=” ”> Content Name </option>
<option value=” ”> Content Name </option>
<optgroup>
</select>
size: Above syntax can define with the size also, so it will display only defined size’s
option only this is like:
<select value=”” size=”4”>
<option value=” ”> Content Name </option>
<option value=” ”> Content Name </option>
<option value=” ”> Content Name </option>
<option value=” ”> Content Name </option>
</select>
autofill: select tag also used to autofill into the field values as follows: Popular Course in this categoryHTML Training (12 Courses, 19+ Projects, 4 Quizzes)12 Online Courses | 19 Hands-on Projects | 89+ Hours | Verifiable Certificate of Completion | Lifetime Access | | 4 Quizzes with Solutions
4.5 (6,502 ratings)Course Price
₹6999 ₹41999
View Course
Related CoursesBootstrap Training (2 Courses, 6+ Projects)XML Training (5 Courses, 6+ Projects)CSS Training (9 Courses, 9+ Projects)
<select >
<option value=” ” autocomplete=”off”> Content Name </option>
<option value=” ”> Content Name </option>
<option value=” ”> Content Name </option>
<option value=” ”> Content Name </option>
</select>
autofocus: we can focus on one specific option from the list at a time as follows. One can use only one autofocus into a single page.
<select autofocus>
<option value=” ”> Content Name </option>
<option value=” ”> Content Name </option>
<option value=” ”> Content Name </option>
</select>
link: Select tag is used to open form link through specified option as defined in the following syntax:
<form action=”” id=”name”>
</form>
<Select name=”” form=”Id_name”>
<option value=” ”> Content Name </option>
</select>
required: This option into the select tag defines a compulsory option from the defined list before the actual submission of the form.
<select name=”value” required>
<option value=” ”> Content Name </option>
<option value=” ”> Content Name </option>
</select>
placeholder: As we know, if using select tag then it will consider the first option as a default option, but if we want to show some option as default, then we can set the selected keyword to the specific option as follows:
<select name=”value” >
<option value=” ”> Content Name </option>
<option value=” ” selected> Content Name </option>
</select>
disabled: one more useful trick in the select tag to show option in the disabled format as follow:
Using this one can show the option, but it’s not possible to take any action.
<select name=”value” >
<option value=” ” disabled> Content Name </option>
<option value=” ”> Content Name </option>
</select>
Examples of Select Tag in HTML
Here are the following examples mention below
Example #1
In this example, we are going to show a simple select tag as a selection list, optgroup and for selecting multiple options at a time as shown below:
Code
<!DOCTYPE html>
<html>
<head>
<meta name="viewport" content="width=device-width, initial-scale=1.0">
<style>
.div-container {
display: table;
width: 100%;
}
.block {
display: table-cell;
padding: 10px;
}
</style>
</head>
<body>
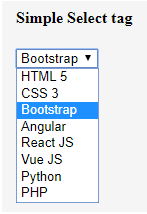
<div class="div-container">
<div class="block">
<h4>Simple Select tag </h4>
<select name="Web Languages">
<option> HTML 5 </option>
<option> CSS 3</option>
<option> Bootstrap </option>
<option>Angular </option>
<option> React JS </option>
<option> Vue JS</option>
<option>Python </option>
<option>PHP</option>
</select> <br>
</div>
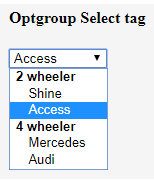
<div class="block" >
<h4>Optgroup Select tag </h4>
<select>
<optgroup label="2 wheeler">
<option value="Honda">Shine</option>
<option value="Suzuki">Access</option>
</optgroup>
<optgroup label="4 wheeler">
<option value="m">Mercedes</option>
<option value="o">Audi</option>
</optgroup>
</select>
</div>
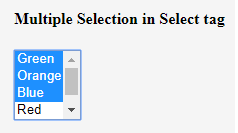
<div class="block" >
<h4>Multiple Selection in Select tag </h4>
<select multiple>
<option> Green </option>
<option> Orange</option>
<option> Blue </option>
<option>Red </option>
<option> Yellow </option>
</select>
</div>
</div>
</body>
</html>
Output:
Example #2
This Example defines how to open from link through <select > tag
Code
<!DOCTYPE html>
<html>
<head>
<title>select Tag form link</title>
</head>
<body>
<form action = "C:\Users\Sonali\Desktop\HTML colspan.html" method = "post">
<select name = "list">
<option value = "menu 1">Colspan tag</option>
<option value = "menu 2" selected>Font Tag</option>
</select>
<input type = "submit" value = "Submit" />
</form>
</body>
</html>
Output: After selecting the Colspan tag value and selecting it with the submit button, the list will open the linked form.


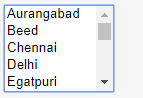
Example #3
There are multiple options in the list but, It will show option as per defined size.
Code
<!DOCTYPE html>
<html>
<head>
<title>select Tag form link</title>
</head>
<body>
<select name = "places" size="5">
<option>Aurangabad</option>
<option>Beed</option>
<option>Chennai</option>
<option>Delhi</option>
<option >Egatpuri</option>
<option >Firozabad</option>
<option >Fatimpur</option>
<option >Goa</option>
<option >Harihareshwar</option>
<option >Indonesia</option>
<option >Japan</option>
<option >Kolkata</option>
<option >Latur</option>
<option >Mumbai</option>
<option  >Nagpur</option>
<option >Oty</option>
<option  >Pune</option>
<option >Qatar</option>
<option >Raipur</option>
<option  >Sholapur</option>
<option >Tamil Nadu</option>
<option  >Uttarakhand</option>
</select>
</body>
</html>
Output:
Conclusion
Select tag in HTML is used to display the selection list to choose one or multiple options from the selection list.
<select> tag can be used with values like selected, required, disabled, required, autofill, autofocus, link, size, multiple, placeholder, optgroup and many more.
Recommended Articles
This is a guide to Select Tag in HTML. Here we discuss the examples of Select Tag in HTML along with the syntax and output. You may also have a look at the following articles to learn more –