

Introduction to Option Tag in HTML
Option tag is the most useful element in the HTML, which is used within the dropdown list to select specific user preference from the selection list. At a time, one user can select one or more options from the given list. This is the main benefit of option tags in HTML. <option> element always include within the <select> </select> tag. or the tag e=which is also known as <datalist> … </datalist>.For single option, one can use <option> element, whereas for multiple option choice, we can use one of HTML’s attribute called as <optgroup>Wherever the user is going to call datalist through scripts or going to send data to the server, then <select> tag is used within the <form> tag.
Syntax with Example
Here is the syntax that helps us determine where exactly the option tag will define within our web page or HTML.
Syntax:
<select>
<option value=””> option1 </option>
<option value=””> option2 </option>
<option value=””> option3 </option>
<option value=””> option4 </option>
</select>
As shown above syntax, <select></select> is a tag used to create datalist.<option> tag enclosed in the select tag is an attribute value or attributes for selection list, the value will be for showing weather option is selected, disabled or with any other properties. option1,2….will be the name.
With the help of CSS, we can give effects to our selection list, able to set positions like a relative, absolute, etc., able to set width and do many other functions. The position for the drop-down list is defined into two values, position relative who is used to display the content of the list exactly right below the select list button. With the help of position: absolute;
Example:
This will restrict the user to select a single option from the selection list.
<select name=”State”>
<option value=”MH”>Maharashtra</option>
<option value=”GJ”> Gujarat </option>
<option value=”MP”> Madhya Pradesh </option>
<option value=”RJ”>Rajasthan </option>
<option value=”AP”>Andhra Pradesh </option>
</select>
Similarly, as we all know that we can also select multiple options as per choice into the selection list. Popular Course in this categoryHTML Training (12 Courses, 19+ Projects, 4 Quizzes)12 Online Courses | 19 Hands-on Projects | 89+ Hours | Verifiable Certificate of Completion | Lifetime Access | | 4 Quizzes with Solutions
4.5 (6,502 ratings)Course Price
₹6999 ₹41999
View Course
Related CoursesBootstrap Training (2 Courses, 6+ Projects)XML Training (5 Courses, 6+ Projects)CSS Training (9 Courses, 9+ Projects)
Syntax:
<select multiple>
<option value=””> option1 </option>
<option value=””> option2 </option>
<option value=””> option3 </option>
<option value=””> option4 </option>
</select>
An example for the same syntax is as follows:
<select name=”laptops” multiple>
<option value=”hp”>HP</option>
<option value=”dell”>Dell</option>
<option value=”lv”>Lenovo</option>
<option value=”sony”>Sony </option>
</select>
Attributes of Option Tag in HTML
<option> tag supports specific attributes are as follows:
- disabled: This attribute used by setting Boolean value in the forms of true and false. If it is set to true, then the option from the list will be disabled; otherwise, it is false.
- label: Suppose we want to give some text as a label, then it’s possible into the option tag. It will consider as a value to that element.
- selected: In the web page designing, some cases come where we want to show the option as already selected in the display view. So by setting attributes selected to the options, one can show selected options in the list. One can show only one selected item from the list.
- value: one can also be able to set the value to the option in the selection list.
Examples of Option Tag in HTML
Below are the different examples of Option Tag in HTML:
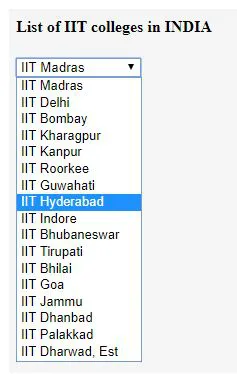
Example #1
This is simple example of selection list including <option> tag.
Code:
<!DOCTYPE html>
<html>
<head>
<title>Option tag in HTML</title>
</head>
<body>
<h4>List of IIT colleges in INDIA</h4>
<form>
<select name = "dropdown">
<option value = "im" >IIT Madras</option>
<option value = "id" >IIT Delhi</option>
<option value = "ib" >IIT Bombay </option>
<option value = "ikh" >IIT  Kharagpur</option>
<option value = "ikn">IIT Kanpur</option>
<option value = "ir" >IIT Roorkee</option>
<option value = "ig" >IIT Guwahati</option>
<option value = "ih">IIT Hyderabad </option>
<option value = "ii">IIT Indore</option>
<option value = "ib">IIT Bhubaneswar</option>
<option value = "it" >IIT Tirupati</option>
<option value = "ib">IIT Bhilai</option>
<option value = "ig">IIT Goa</option>
<option value = "ij" >IIT Jammu</option>
<option value = "idb">IIT Dhanbad </option>
<option value = "ip">IIT Palakkad</option>
<option value = "idhe">IIT Dharwad, Est</option>
</select>
</form>
</body>
</html>
Output:
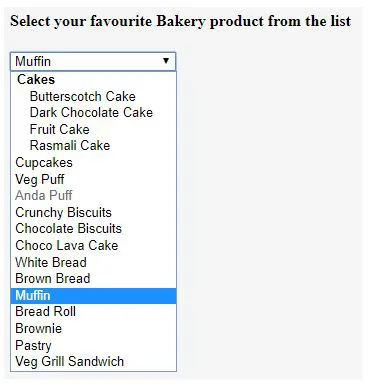
Example #2
Example for showing <option> tag which uses values like selected, disabled , <optgroup>
Code:
<!DOCTYPE html>
<html>
<head>
<title>Option tag in HTML</title>
</head>
<body>
<h4>Select your favourite Bakery product from the list</h4>
<form>
<select name = "dropdown">
<optgroup label="Cakes">
<option value = "BS" >Butterscotch Cake</option>
<option value = "DC" >Dark Chocolate Cake</option>
<option value = "FC" >Fruit Cake</option>
<option value = "RC" >Rasmali Cake</option>
</optgroup>
<option value = "cc">Cupcakes</option>
<option value = "vp" required>Veg Puff</option>
<option value = "ap" disabled>Anda Puff</option>
<option value = "cb">Crunchy Biscuits </option>
<option value = "cob">Chocolate Biscuits</option>
<option value = "clc">Choco Lava Cake</option>
<option value = "wb" >White Bread</option>
<option value = "bb">Brown Bread</option>
<option value = "mf" selected>Muffin</option>
<option value = "br" >Bread Roll</option>
<option value = "bw">Brownie </option>
<option value = "ps">Pastry</option>
<option value = "vgs">Veg Grill Sandwich</option>
</select>
</form>
</body>
</html>
Output:
Example #3
In this example, we are going to select multiple options from the datalist.
Code:
<!DOCTYPE html>
<html>
<body>
<h2>Top IT training Institutes in Pune </h2>
<form id="multidd">
<select id="multiselectopt">
<option> ABCIS Learning </option>
<option> MindScripts Technologies </option>
<option> Sysap technologies </option>
<option> IclassPune</option>
<option>  IIHT</option>
<option> Magneto Academy </option>
<option> Certification Guru </option>
<option> I Cert Global </option>
<option> Technogeeks </option>
</select>
<input type="button" onclick="multipleFunc()" value="Select multiple options">
</form>
<p>Multiple options can be selected here. Press ctrl key and select multiple option from the list.</p>
<script>
function multipleFunc() {
document.getElementById("multiselectopt").multiple = true;
}
</script>
</body>
</html>
Output:

Conclusion
From all the above information, we came to know that the <Option> tag in the selection list or into the datalist is responsible for selecting the option as per user choice. One can select one or more options from the drop-down list. If we have multiple options included in the list, we can divide it into the <optgroup> element.
Recommended Articles
This is a guide to Option Tag in HTML. Here we discuss the basic concept, syntax, attributes, and examples of option tag in HTML. You may also have a look at the following articles to learn more –