
Introduction to HTML Progress Bar
According to the W3C standard, the progress bar is meant to complete a particular task using a progress element. Progress tag is used to display a progress bar and to represent any file uploading progress on the web page; this tag has been used in HTML, and eventually, this tag makes web developers an easy way to display the bar. This tag is entirely different from the <meter> tag, representing the usage of disk space. And It is supported in HTML5, and the constant growth on HTML5 helps to introduce an interesting tool.
Syntax:
This progress element has both the starting and ending tag, and below shows the tag’s basic syntax. It is used to imply the status of any process. The progress bar has inline display manners.
<Progress bar>
……
</Progress bar>
Attributes
Attributes provide an informative element like the behavior of explorer in the HTML. There are three different attributes in the HTML, namely event attributes and global attributes. In addition to these attributes, the progress element has two new attributes, which are listed below:
max – The default value is given as 1.0 and indicates the total number of works needed to complete the task.
value – This specifies how much work has to be finished. The default value is assigned as less than 1.0. In the absence of the Val attribute, the progress bar is indeterminate.
Examples of progress bars include attaching a file, loading the document for the first time or a web page loading. Popular Course in this categoryAll in One Financial Analyst Bundle (250+ Courses, 40+ Projects)250+ Online Courses | 1000+ Hours | Verifiable Certificates | Lifetime Access
4.9 (3,296 ratings)Course Price
₹8999 ₹125000
View Course
Related CoursesHTML Training (12 Courses, 19+ Projects, 4 Quizzes)Bootstrap Training (2 Courses, 6+ Projects)XML Training (5 Courses, 6+ Projects)CSS Training (9 Courses, 9+ Projects)
Methods to Create Progress Bar in HTML
A progress bar is defined by two different states: determinate and indeterminate. In the case of the indeterminate progress bar, the value attribute is assigned null, which is quite easy to style. Coming to a determinate state, they are defined by two new attributes, max and Val, for all the below examples. It uses some motion like appearance to indicate the task with the horizontal bar. If the respective work is not depending on the task, then the < meter> tag is assigned. Coming to browser compatibility, it supports all the browsers except Internet Explorer (partial support). Depending upon the browser compatibility progress bar may look different. Throughout this article, we will be concentrating on the determinate state of the bar with max and Val attribute.
Example: Now, let’s look out for the basic implementation of a progress bar with min and val attributes.
<!DOCTYPE html>
<html>
<body>
Downloading on process:
<progress value="19" max="90">
</progress>
<p><strong>Note:</strong> The progress tag is used to represent a progress bar for quite period of time. </p>
</body>
</html>
Output:

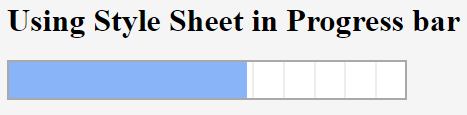
1. Using CSS
Next, we shall see how to make a progress bar stylish to look consistent on all platforms. The progress bar is marked up using a value selector, and we can also fit the dimensions like width and height to the progress element to display a stylish progress bar. This stuff gets complicated when used by different browsers. The browser itself make some adjustment to caliber the completion of the task. Making html bar to look candid by applying the dimensional effect.
The basic simple example is illustrated below:
<!DOCTYPE>
<html>
<head>
<h1> Using Style Sheet in Progress bar </h1>
<style>
progress{width:400px;height:40px}
</style>
</head>
<body>
<progress value="60" max="100"></progress>
</body>
</html>
Output:
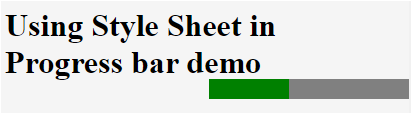
2. Using Box Shadows and Colors
With stylesheet, we can add style rules to this element by giving background color, assigning height, etc. The colors can be applied by applying the rgba() function. The progress bar element can be done with different colors to display the result good. This is mapped with the attribute ‘class’. Generally, the progress bar moves from left to right to indicate the task as they start from the initial ‘0’ and displays the results once it reaches the target.
<!DOCTYPE>
<html>
<head>
<h1> Using Style Sheet in Progress bar demo </h1>
<style>
progress{width:200px;height:20px;background-color:pink;
border-radius: 4px;position: absolute;
right: 0px;
top: 80px;
box-shadow: 0 3px 6px rgba(255, 255, 0, 255) inset;}
</style>
</head>
<body>
<progress value="40" max="100"></progress>
</body>
</html>
Output:
NOTE: Different browser handles the bar a bit variants. Chrome uses Webkit Stylesheet by replacing native styles.
Sample:
progress bar :: – WebKit-Progress-bar
Even a progress bar size can be varied with small, medium and large using the class attribute.
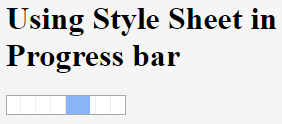
3. Using Span
The below code is indeterminate, showing some process is going on for a period of time.
<!DOCTYPE>
<html>
<head>
<h1> Using Style Sheet in Progress bar </h1>
<style>
progress{width:120px;height:20px}
</style>
</head>
<body>
<progress max="100">
<span>20</span>%
</progress>
</body>
</html>
Output:
4. Using JavaScript Example
The following rules have to be done using javascript. Creating <div> element if needed and next creating style sheet, finally embedding them together. The below code shows the basic progress bar with JavaScript.
Example #1:
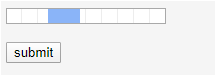
<!DOCTYPE>
<html>
<body>
<script>
var pgx=2;
function bar(){
var prog = document.getElementById ('progress demo');
setInterval (function ()
{
if(pgx<90){
pgx++;
prog.value =pgx;
}
bar();
}, 100);
}
</script>
<progress id="progress demo" min="2" max="100"></progress>
<br/><br/>
<button onclick="bar()"> submit</button>
</body>
</html>
Output:
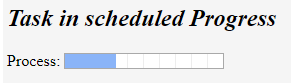
Example #2:
<!DOCTYPE html>
<html lang="en">
<head>
<title>implementation of HTML progress Tag</title>
</head>
<body>
<h2> <i>Task in scheduled Progress </i></h2>
<p>Process: <progress id="bar" value="1" max="100"><span>0</span>%</progress></p>
<script type="text/javascript">
var k = 0;
var progb = document.getElementById("bar");
function count(){
if(k < 100){
k = k + 1;
progb.value = k;
progb.getElementsByTagName("span")[0].textContent = k;
}
setTimeout("count()", 400);
}
count();
</script>
</body>
</html>
Output:
NOTE: Even you can add some animation effects to the progress bar. To do so, we have to assign some interval timings by assigning some value to it and directing incrementing infinitely, to make the situation control conditional statement is used.
Conclusion
Therefore, this article explains how to create an HTML progress bar that is highly flexible and light-weighted. Finally, we have seen the concept briefly as they are the activity indicators. This element indicates how to load a page or make some registration process and probably represents a percentage of 100 for max value. When the time task’s length is unknown, this mode has usually been used in the installation or loading page scenario. And that’s even an implementation using Html5 is done with some cool effects.
Recommended Articles
This is a guide to HTML Progress Bar. Here we discuss an Introduction and how to create a progress bar in HTML using various methods. You may also have a look at the following articles to learn more –