

Introduction to HTML Legend Tag
Legend Tag is used to define a caption or title to the <field set> tag, and it is considered the first child of this element. Being a caption, it is usually placed on top of the frame. The purpose of <field tag> is to create a surrounding box on the particular element’s content. The main purpose is to wrap the forms, images, content with the help of the fieldset also serve to describe the context of the information. In the following portion, we shall discuss the information on the <legend> tag as well as an example in-depth. The main motto of this article is to show how simple and creatively HTML elements Tags are used for a presentation.
Syntax
<legend>
……
</legend>
The HTML <fieldset> element is placed within the <body> element, and it is marked black border around it; and if you want a stylish or change the behavior of the frame, then CSS is used here. This tag is completely different from <div> tag. And this tag supports all the browsers like Chrome, android, firefox, Opera, Internet Explorer. And all these elements are uniform with all the browsers.
Code:
<fieldset>
<legend>
Text
</legend>
… Content
<fieldset>
Have to provide both the Starting and Ending Tags.
Attributes
In general, HTML tags has one or more attributes that provide a great aspect of an HTML element. The Legend Tag supports all the defined global attributes. Some attributes don’t support modern web browsers. The following table gives the tag attributes with their descriptions.
1. Tag-Specific Attributes
align: Defines an alignment of the title or caption given in the form with respect to the parent <fieldset>.
Code:
<fieldset>
<legend align="center">Align
demo:</legend>
Note: For a clear alignment, it is better to use CSS-Align for the variations of an element.
2. Standard Attributes
The description of these attributes has already been discussed in the previous article.
- Access key
- class
- dir
- id
- Style
- lang
- id
- tab index
- title
3. Global Attributes
The legend tag also accepts Previously discussed Global Attributes, which is a standard across all the HTML5 elements. Some are listed below: Popular Course in this categoryHTML Training (12 Courses, 19+ Projects, 4 Quizzes)12 Online Courses | 19 Hands-on Projects | 89+ Hours | Verifiable Certificate of Completion | Lifetime Access | | 4 Quizzes with Solutions
4.5 (6,492 ratings)Course Price
₹6999 ₹41999
View Course
Related CoursesBootstrap Training (2 Courses, 6+ Projects)XML Training (5 Courses, 6+ Projects)CSS Training (9 Courses, 9+ Projects)
| Context | Define the Context |
| Dir | The values give the path of the text. |
| Id | Its identifier must match the value of a name. |
| Style | Specifies the inline and external styles. |
| Lang | Determines the language used in the text. |
4. Event Attributes
| onabort | It is called when a particular event has been aborted. For example, the web browser immediately video before it is completely downloaded. |
| onblur | Defines the focus of the element. |
| oncancel | Stops the processed event handler. |
| Onclick | Triggers when a click is done |
| onchange | When a click is done somewhere. |
| onfocus | Triggered when the focus is on the given element |
5. Other Attributes Are
onmouse down, onmouse up, onmouse over, onmouse move, onmouse out, on focus, on blur, onkey press,onkey down,onkey up. The tags that come with the <legend> tag are listed below:
- <a>
- <big>
- <br>
- <img>
- <iframe>
- <textarea>
- <select>
- <script>
- <del>
- <dfn>
- <i>
- <button>
Examples to Implement Area Tag in HTML
Below are the examples of implementing the area tag in HTML:
Example #1
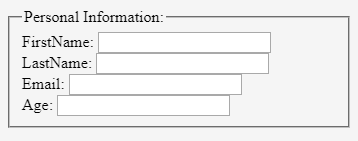
This section focuses on the form and fieldset. Association of legend tags with the fieldset and preferring to use with the forms gives the best option.
Code:
<!DOCTYPE html>
<html>
<body>
<form>
<fieldset>
<legend>Personal Information:</legend>
FirstName:  <input type="text"><br>
LastName:  <input type="text"><br>
Email: <input type="text"><br>
Age: <input type="text">
</fieldset>
</form>
</body>
</html>
Output:
Example #2
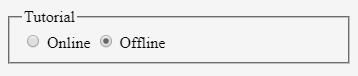
The below examples show how the fieldset element groups the labels and radio buttons and checklist together. Meanwhile, the legend tag should be given for the caption for the group. A similar approach can be implemented with other controls.
Code:
<!DOCTYPE html>
<html>
<body>
<form action="http://www.educba.com/" method="post">
<fieldset>
<legend>Tutorial</legend>
<input type="radio" name="tutorial class" value="online" id="online">
<label for="online">Online</label>
<input type="radio" name="tutorial class" value="offline" id="offline">
<label for="offline">Offline</label>
</fieldset>
</form>
</body>
</html>
Output:
Example #3
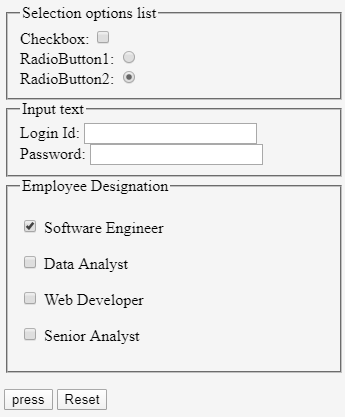
In the following example, we group the information under the HTML tag <form>. And each control has been declared under the <field set> element as the first child to it.
Code:
<!DOCTYPE HTML >
<html>
<head>
<title>HTML Test with buttons</title>
<meta http-equiv="Content-Type" content="text/html; charset=utf-8">
</head>
<body>
<form action="example demo" method="post">
<fieldset>
<legend>Selection options list</legend>
Checkbox: <input type="checkbox" name="checkex" value="on"><br>
RadioButton1: <input type="radio" name="radbtest" value="one"><br>
RadioButton2: <input type="radio" name="radb1test" value="two"
checked="checked"><br>
</fieldset>
<fieldset>
<legend>Input Text</legend>
Login Id: <input type="text" name="text ex"><br>
Password: <input type="password" name="pwd test"><br>
</fieldset>
<fieldset>
<legend>Employee Designation</legend>
<p><input type="checkbox" name=" Software Engineer"> Software Engineer</p>
<p><input type="checkbox" name="Data Analyst"> Data Analyst</p>
<p><input type="checkbox" name="Web Developer"> Web Developer</p>
<p><input type="checkbox" name=" Senior Analyst"> Senior Analyst</p>
</fieldset>
<p><input type="submit" value="press"> <input type="reset"></p>
</form>
</body>
</html>
Output:
Example #4
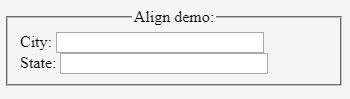
Using Align Attributes Demo. Align attributes has three values
- align= “center”,
- align= “right”
- align= “left”
Code:
<!DOCTYPE html>
<html>
<body>
<form>
<fieldset>
<legend align="center">Align demo:</legend>
City: <input type="text" size="25"><br>
State: <input type="text" size="25"><br>
</fieldset>
</form>
</body>
</html>
Output:
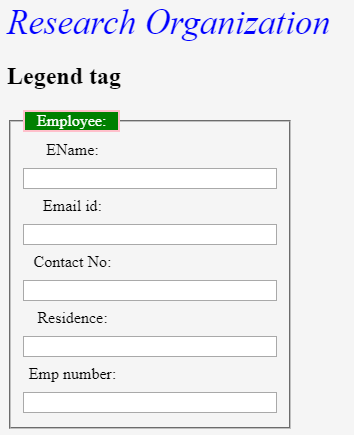
Example #5
Using CSS- Style. Using CSS, the Legend caption/Title colour is changed by declaring a color attribute to various colors.
Code:
<!DOCTYPE html>
<html>
<head>
<title>Legend Tag Implementation</title>
<style>
form{
width: 45%;
}
legend {
display: block;
padding-left: 12px;
padding-right: 12px;
border: 2px solid pink;
background-color:green;
color:white;;
}
label {
display: inline-block;
float: left;
clear: left;
width: 91px;
margin:4px;
text-align: center;
}
input[type="text"] {
width:250px;
margin:4.5px 0px;
}
.cba {
font-size:35px;
color:blue;
font-weight:500;
font-style :italic;
}
</style>
</head>
<body>
<div class = "cba"> Research Organization</div>
<h2>Legend tag</h2>
<form>
<fieldset>
<legend>Employee:</legend>
<label> EName:</label><input type="text">
<br>
<label>Email id:</label><input type="text">
<br>
<label>Contact No:</label><input type="text">
<br>
<label>Residence:</label><input type="text">
<br>
<label>Emp number:</label><input type="text">
</fieldset>
</form>
</body>
</html>
Output:
Conclusion – HTML Legend Tag
To conclude, we have seen how the legend tag has been used as a caption for a group element. The use of this article benefits the HTML components. Also, the legend improves good accessibility when the fieldset is null. It is considered to be the best design-related group tag in HTML5. These tags are very useful in web development with proper CSS code with proper design techniques.
Recommended Articles
This is a guide to HTML Legend Tag. Here we discuss the attributes and different examples to implement the area tag in HTML. You can also go through our other related articles to learn more –