Introduction to HTML Form Action
In HTML, we have using a form tag to navigate the web pages. The tag which consists of action, methods and values attribute in the HTML. The Method attributes which specified how to send the data from one page to another page after validation. Generally, we have sent the form data through URL Methods like get and post. Form Tag in HTML is used for web pages that are the user to enter data it will move to server validation, it can resemble the pages because the server validates the user request. Even though all the html tags like checkboxes, radio buttons, text fields, etc..those fields will use the form to validate purpose in the backend.
Form Action in HTML
Whenever we enter the data in the view page(user) using a browser, it will move to the backend. The HTML action needs some attributes to specify the request if; suppose we have a JSP page with servlet; the user enters the data in frontend those datas which handles using the form known as form data. The value of an HTML action attribute is nothing but a URL; there is no default value of HTML action attributes.
Syntax:
<html>
<body>
<form action=”/controller pages(jsp,servlet,html,php)” method=”get/post”>
………..Some html tags and user defined values…..
</form>
</body>
</html>
The above syntax is the basics for creating the forms in html. It is the flow of navigating the web pages.
Examples of HTML Form Action
Following are the example of html form action as given below:
Example #1
Code:
<html>
<body>
<form action="C:\\Users\\SUN-4\\Documents\\New folder\\fisrst.jsp" method="get">
First name: <input type="text" name="fname"><br>
Last name: <input type="text" name="lname"><br>
<input type="submit" value="Submit">
</form>
</body>
</html>
<html>
<body>
<% String fname=request.getparameter("fname");%>
<% String lname=request.getparameter("lname");%>
<% out.println("Your input was received as:" +"FirstName=fname & LastName=lname");
%>
</body>
</html>
Output:

Code Explanation: In the above example, we will use the action page as JSP; after the user entered the data, it will validate from the jsp page and display the output on the browser screen.Note: Whenever we use jsp, we need application servers like tomcat, jetty, WebLogic, etc.
Example #2
Code:
<html> Popular Course in this categoryHTML Training (12 Courses, 19+ Projects, 4 Quizzes)12 Online Courses | 19 Hands-on Projects | 89+ Hours | Verifiable Certificate of Completion | Lifetime Access | | 4 Quizzes with Solutions
<body>
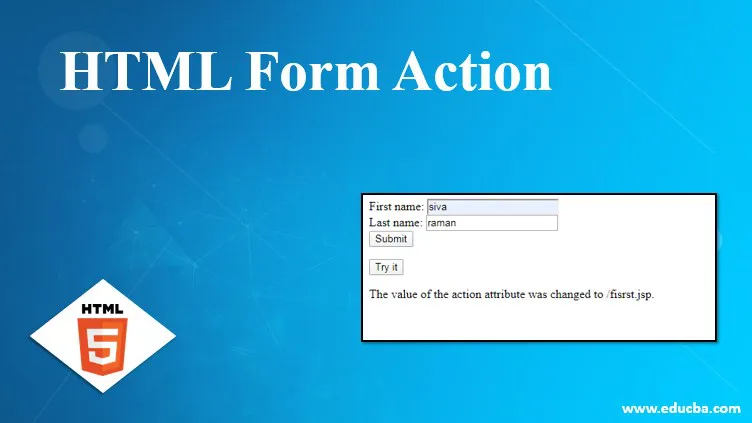
<form id="form1" action="C:\\Users\\SUN-4\\Documents\\New folder\\fisrst.jsp" method="get">
First name: <input type="text" name="fname"><br>
Last name: <input type="text" name="lname"><br>
<input type="submit" value="Submit">
</form>
<button onclick="myFunction()">Try it</button>
<p id="demo"></p>
<script>
function myFunction() {
document.getElementById("form1").action = "https://cdn.educba.com/fisrst.jsp";
document.getElementById("demo").innerHTML = "The value of the action attribute was changed to /fisrst.jsp.";
}
</script>
</body>
</html>
4.5 (6,502 ratings)Course Price
₹6999 ₹41999
View Course
Related CoursesBootstrap Training (2 Courses, 6+ Projects)XML Training (5 Courses, 6+ Projects)CSS Training (9 Courses, 9+ Projects)
Output:

Code Explanation: In the above example, we will use the javascript function for navigating the web pages or not. If we use the javascript function in the HTML, it will more use of validation, alert the messages and whatever the user-customized information is to be validated by the scripts. We use the DOM object that is the Document Object Model, a model for accessing the documents and is a platform and language-neutral interfaces that allow programs to dynamically access and update the content structure and styles of the user-defined datas.
Example #3
Code:
<html>
<style>
body {
color: yellow;
height: 100vh;
background:Green;
text-align: center;
}
input {
width: 315px;
padding: 8px;
background: Green;
border-radius: 20px;
}
::placeholder {
color: Green;
}
.btn {
background:Green;
height: 200px;
width: 300px;
}
</style>
<body>
<form id="form1" action="C:\\Users\\SUN-4\\Documents\\New folder\\fisrst.jsp" method="get">
First name: <input type="text" name="fname"><br>
Last name: <input type="text" name="lname"><br>
<input type="submit" value="Submit">
</form>
<button onclick="myFunction()">Try it</button>
<p id="demo"></p>
<script>
function myFunction() {
document.getElementById("form1").action = "https://cdn.educba.com/fisrst.jsp";
document.getElementById("demo").innerHTML = "The value of the action attribute was changed to /fisrst.jsp.";
}
</script>
</body>
</html>
Output:

Code Explanation: The above example is the basic purpose; whenever we develop the web page, it will need to satisfy the user requirements and be more attractive on the user side. Only the user will be more interested in using our Applications. So the above example, we use CSS Style in the form page is one of the more attractive and interacts with the user side.
Send Emails Using HTML Forms
It is one of the best features for web developers by using the browsers to allow them to route the form directly to a user email address after submission and is one of the ideas, but the reason is that if the browsers allowed emailing directly from the web form page that also will reveal the visitor’s email address directly, it also affects the users data. The hacker can collect the user information easily from the email address of the user web page and then spam it.
In order to protect the web users, no client-side language can send an email directly without the user interventions. We can set the form action field like as “mailto”, using this case, the browser invokes the mail client to send the form submission to the particular email address, which is to be user-specified.
Example:
<form action="mailto:ramansiva57@gmail.com">
Generally, HTML form has two parts: the user point of view, that is, the front end form that you see in the browser screen, and the second is a back-end script that runs on the web servers. Your web browsers display the form using some HTML codes; after submitting the form, the browser sends the information whatever you submitted data in the form to the backend.
Some links we have defined in the above examples.
<form action="https://cdn.educba.com/First.jsp">
The browser will pick the URL mentioned in the form of action attributes and send the data to that URL, using web servers passes the form submission data to the script in the action URL(example.jsp). Now the backend scripts also send emails after submitted for the form data to the database.
Send Mail Using jsp
Here we discuss how to send mail using jsp:
<%@ page import = "java.io.*,java.util.*,javax.mail.*"%>
<%@ page import = "javax.mail.internet.*,javax.activation.*"%>
<%@ page import = "javax.servlet.http.*,javax.servlet.*" %>
<%
String result;
// Recipient's email ID needs to be mentioned.
String to = "ramansiva57@gmail.com";
// Sender's email ID needs to be mentioned
String from = "xxx@gmail.com";
// Assuming you are sending email from localhost
String host = "localhost";
// Get system properties object
Properties properties = System.getProperties();
// Setup mail server
properties.setProperty("mail.smtp.host", host);
// Get the default Session object.
Session mailSession = Session.getDefaultInstance(properties);
try {
// Create a default MimeMessage object.
MimeMessage message = new MimeMessage(mailSession);
// Set From: header field of the header.
message.setFrom(new InternetAddress(from));
// Set To: header field of the header.
message.addRecipient(Message.RecipientType.TO,
new InternetAddress(to));
// Set Subject: header field
message.setSubject("Subject!");
// Now set the actual message
message.setText("Message");
// Send message
Transport.send(message);
result = "Sent message successfully....";
} catch (MessagingException mex) {
mex.printStackTrace();
result = "Error: unable to send message....";
}
%>
<html>
<body>
<center>
<h1>Send Email using JSP</h1>
</center>
<p align = "center">
<%
out.println("Result: " + result + "\n");
%>
</p>
</body>
</html>
Output:

Code Explanation: In the above sample programs, we already noted the information using some application servers to run the above codes; it will send the email using jsp programs.
Conclusion
In the latest technology, we have many features to reduce the workload and have a responsibility for updating the knowledge day to day. The same thing in HTML and HTML5 is the latest version of the HTML is having the same features but some more steps to the compatibility of the browsers. We have to check whenever we use HTML and HTML 5 is supported by the browsers or not. We have a lot of features in HTML, as discussed later.
Recommended Articles
This is a guide to HTML Form Action. Here we discuss the Introduction and how to send emails using html forms along with different examples and its code implementation. You may also have a look at the following articles to learn more –