Introduction to HTML Marquee Tag
Marquee tag in HTML is used for creating a scroll over the text or the image in the web page, which allows all types of scrolls like left to right, right to left, top to bottom and bottom to top. The syntax for this tag in HTML is <html><body><marquee direction=”up” height=”150″ width=”250″ bgcolor= “white”>This is scrolling of the text…</marquee></body></html>, where the ‘marquee’ tag is used to describe the properties of the required scroll. A few other commonly used marquee attributes are behaviour, hspace, scrollamount, scrolldelay, truespeed, vspace, etc.
Syntax:
The marquee can be used by using the <marquee> element. The syntax can be written as shown below:
<html>
<body>
<marquee direction="up" height="150" width="250" bgcolor="white">This is scrolling of the text...</marquee>
</body>
</html>
Attributes of HTML Marquee Tag
Following are the attributes which are supported by the <marquee> tag.
- behavior: The action of scrolling the text which can be one of the values, including alternate, scroll, and slide.
- bgcolor: It gives background color.
- direction: It specifies the direction for scrolling the text with left, right, up and down values. The default direction value is left.
- height: It defines a height for the marquee.
- hspace: This attribute provides horizontal space around the marquee element.
- loop: It defines how many times the text can be scrolled. The marquee will loop continuously if the default value is -1.
- scrollamount: It specifies the scrolling amount for each interval. If there is no scrollamount defined, then the default value is 6.
- scrolldelay: It gives the scrolling delay in milliseconds. If there is no scrollamount defined, then the default value is 6.
- truespeed: It is used to indicate the scrolldelay value of 60.
- vspace: This attribute provides vertical space around the marquee element.
- width: It defines a width for the marquee.
Examples of HTML Marquee Tag
Following are the examples of the HTML marquee tag explained below:
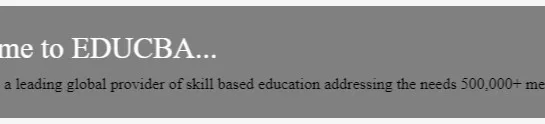
Example #1 – Marquee Left
This type of marquee can be used to move the content from the left side.
Code:
<!DOCTYPE html> Popular Course in this categoryHTML Training (12 Courses, 19+ Projects, 4 Quizzes)12 Online Courses | 19 Hands-on Projects | 89+ Hours | Verifiable Certificate of Completion | Lifetime Access | | 4 Quizzes with Solutions
<html>
<head>
<title>Left Marquee</title>
<style>
.mrq_class {
text-align:center;
}
.marq_class1 {
padding-top:25px;
padding-bottom:25px;
}
.txt {
font-size:30px;
font-weight:italic;
color:white;
padding-bottom:10px;
}
</style>
</head>
<body>
<div class = "mrq_class">
<marquee class="marq_class1" bgcolor = "grey" direction = "left" loop="" >
<div class="txt">Welcome to EDUCBA...</div>
<div>EDUCBA is a leading global provider of skill based education addressing the needs 500,000+ members across 40+ Countries.</div>
</marquee>
</div>
</body>
</html>
4.5 (6,492 ratings)Course Price
₹6999 ₹41999
View Course
Related CoursesBootstrap Training (2 Courses, 6+ Projects)XML Training (5 Courses, 6+ Projects)CSS Training (9 Courses, 9+ Projects)
Output:
- Save the above code in a file with a .html extension
- Run the HTML file in a browser, and you would get the output as shown in the below image

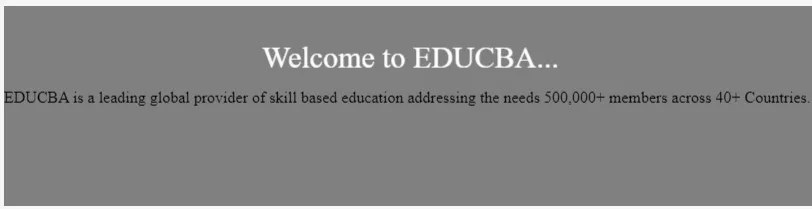
Example #2 – Marquee Right
This type of marquee can be used to move the content to the right side.
Code:
<!DOCTYPE html>
<html>
<head>
<title>Right Marquee</title>
<style>
.mrq_class {
text-align:center;
}
.marq_class1 {
padding-top:25px;
padding-bottom:25px;
}
.txt {
font-size:30px;
font-weight:italic;
color:white;
padding-bottom:10px;
}
</style>
</head>
<body>
<div class = "mrq_class">
<marquee class="marq_class1" bgcolor = "grey" direction = "right" loop="" >
<div class="txt">Welcome to EDUCBA...</div>
<div>EDUCBA is a leading global provider of skill based education addressing the needs 500,000+ members across 40+ Countries.</div>
</marquee>
</div>
</body>
</html>
Output:
Example #3 – Marquee Up
This type of marquee can be used to move the content to the upside.
Code:
<!DOCTYPE html>
<html>
<head>
<title>Up Marquee</title>
<style>
.mrq_class {
text-align:center;
}
.marq_class1 {
padding-top:25px;
padding-bottom:25px;
}
.txt {
font-size:30px;
font-weight:italic;
color:white;
padding-bottom:10px;
}
</style>
</head>
<body>
<div class = "mrq_class">
<marquee class="marq_class1" bgcolor = "grey" direction = "up" loop="" >
<div class="txt">Welcome to EDUCBA...</div>
<div>EDUCBA is a leading global provider of skill based education addressing the needs 500,000+ members across 40+ Countries.</div>
</marquee>
</div>
</body>
</html>
Output:

Example #4 – Marquee Down
This type of marquee can be used to move the content to the downside.
Code:
<!DOCTYPE html>
<html>
<head>
<title>Down Marquee</title>
<style>
.mrq_class {
text-align:center;
}
.marq_class1 {
padding-top:25px;
padding-bottom:25px;
}
.txt {
font-size:30px;
font-weight:italic;
color:white;
padding-bottom:10px;
}
</style>
</head>
<body>
<div class = "mrq_class">
<marquee class="marq_class1" bgcolor = "grey" direction = "down" loop="" >
<div class="txt">Welcome to EDUCBA...</div>
<div>EDUCBA is a leading global provider of skill based education addressing the needs 500,000+ members across 40+ Countries.</div>
</marquee>
</div>
</body>
</html>
Output:

Example #5 – Nested Marquee
This type of marquee can be used to nest the content.
Code:
<!DOCTYPE html>
<html>
<head>
<title>Nested Marquee</title>
<style>
.mrq_class {
text-align:center;
}
.marq_class1 {
padding-top:25px;
padding-bottom:25px;
}
.txt {
font-size:30px;
font-weight:italic;
color:white;
padding-bottom:10px;
}
</style>
</head>
<body>
<div class = "mrq_class">
<marquee class="marq_class1" bgcolor = "grey" direction = "down" behavior="alternate" height="150" >
<marquee behavior="alternate"><div class="txt">Welcome to EDUCBA...</div></marquee>
<div>EDUCBA is a leading global provider of skill based education addressing the needs 500,000+ members across 40+ Countries.</div>
</marquee>
</div>
</body>
</html>
Output:
Example #6 – Speed Comparison for Marquee
The speed of the marquee element can be specified by using the scrolldelay attribute.
Code:
<!DOCTYPE html>
<html>
<head>
<title>Nested Marquee</title>
<style>
.marq_class1 {
padding-top:25px;
padding-bottom:25px;
}
</style>
</head>
<body>
<marquee class="marq_class1" bgcolor = "grey" direction = "down" behavior="alternate" height="150" >
<marquee scrolldelay="80" scrollamount="7">Welcome to EDUCBA...(normal speed)</marquee>
<marquee scrolldelay="60" scrollamount="12" truespeed>Welcome to EDUCBA...(This is very speed)</marquee>
<marquee scrolldelay="250" scrollamount="4">Welcome to EDUCBA...(This is very slow)</marquee>
</marquee>
</body>
</html>
Output:

Example #7 – Marque Background Color and Space
This type of marquee can be used to set background color and space for the marquee element.
Code:
<!DOCTYPE html>
<html>
<head>
<title>Marquee Background and Space</title>
<style>
.mrq_class {
text-align:center;
}
.marq_class1 {
padding-top:25px;
padding-bottom:25px;
}
</style>
</head>
<body>
<div class = "mrq_class">
<marquee class="marq_class1"  bgcolor="#d9d9ff" hspace="50" vspace="20">
<div>EDUCBA is a leading global provider of skill based education addressing the needs 500,000+ members across 40+ Countries.</div>
</marquee>
</div>
</body>
</html>
Output:

Conclusion
So far, we have studied how the marquee tag will be used to create scrolling text on the webpage. The user can easily create scrolling text horizontally or vertically easily on the websites. This element has been deprecated and will be no longer used. To make the scrolling effect, CSS or JavaScript will be used.
Recommended Articles
This is a guide to HTML Marquee Tag. Here we discuss the basic concept, attributes, and various examples of HTML Marquee Tag with code implementation. You may also look at the following articles to learn more –