

Introduction to Drag and Drop in HTML
Drag and Drop is the latest feature well-known for manually providing input in web pages due to its convenient functional pattern. The drag and drop method can be described as the process when a user selects a specific data/ option from the list of items in the source field, drag the same, and drop it in the destination field. It is implemented using Document Object Model, along with multiple mouse events from the HTML web page. The various events used in this feature are a drag, dragstart, dragleave, dragenter, dragover, drop, dragend and drag exit.
Events for Drag and Drop
There are multiple events included in the latest drag and drop (dnd) functionality; let’s see one by one as follows:
| Sr No | Events | Details Description |
| 1 | Drag | To drag entity(element or text) when the mouse is moved with element to be dragged. |
| 2 | Dragstart | The very first step in drag and drop is dragstart. It’s get executed when the user going to start with dragging the object to the required location. |
| 3 | Dragenter | Dragenter event is used when the mouse is getting hover on the target element. |
| 4 | Dragleave | This event is used when the user releases a mouse from an element. |
| 5 | Dragover | This event occurs when a mouse is used to over an element. |
| 6 | Drop | This event used at the end of the drag and drop process for drop element operation. |
| 7 | Dragend | This is one the most important even in this process for releasing the mouse button from the element to complete the drag procedure. |
| 8 | Dragexit | This event status that the element is no longer onto the drag process of urgent target selection of element. |
Let’s see some data attributes on which Drag and drop operation going to happen:
1. dataTransfer.dropEffect [ = value ]: This attribute is used to show which operation currently going on. one can set it to replace the already selected operation. The values included in it like a copy, link, none or move.
2. dataTransfer.effectAllowed [ = value ]: Whichever operations are allowed will be returned through this attribute. It’s also possible to set to changing already selected operation.
3. dataTransfer.files: This data attribute used to gets fileList of the files which are going to be dragged. Popular Course in this categoryHTML Training (12 Courses, 19+ Projects, 4 Quizzes)12 Online Courses | 19 Hands-on Projects | 89+ Hours | Verifiable Certificate of Completion | Lifetime Access | | 4 Quizzes with Solutions
4.5 (6,502 ratings)Course Price
₹6999 ₹41999
View Course
Related CoursesBootstrap Training (2 Courses, 6+ Projects)XML Training (5 Courses, 6+ Projects)CSS Training (9 Courses, 9+ Projects)
4. dataTransfer.addElement(element): It’s used to insert the already existing element into a list of other elements that are useful to render the drag feedback.
5. dataTransfer.setDragImage(element, x, y): This attribute little bit the same as above for updating drag feedback and help to change already existed feedback
6. dataTransfer.clearData ( [ format ] ): It helps the user to remove data from the already defined format. If the user omitted the argument, the IT would remove all the data.
7. dataTransfer.setData(format, data): It’s one of the popular attributes used to add specified data.
8. data = dataTransfer.getData(format): This attribute in Drag and Drag operation used to extracts specified data. If there is no same data as it, it will return to the empty string.
Syntax of Drag and Drop in HTML
Here are few steps defining the syntax for drag and drop:
Select the object to be a drag: set attribute true to it.
<element draggable=”true”>
Start dragging object :
function dragStart(ev){}
Drop the object :
function dragDrop(ev){}
Examples of Drag and Drop in HTML
The following example will show how exactly drag and drop operation will perform in HTML:
Example #1
Code:
<html>
<head>
<title>Drag and Drop Demo</title>
<script>
function allowDrop(ev) {
ev.preventDefault();
}
function dragStart(ev) {
ev.dataTransfer.setData("text", ev.target.id);
}
function dragDrop(ev) {
ev.preventDefault();
var data = ev.dataTransfer.getData("text");
ev.target.appendChild(document.getElementById(data));
}
</script>
<style>
#box {
margin: auto;
width: 30%;
width: 21%;
height:150px;
border: 2px solid blue;
padding: 2px;
}
#square1, #square2, #square3 {
float: left;
margin: 5px;
padding: 10px;
}
#square1 {
width: 30px;
height: 30px;
background-color: #BEA7CC;
}
#square2 {
width: 60px;
height: 60px;
background-color: #B5D5F5;
}
#square3 {
width: 90px;
height: 90px;
background-color:#F5B5C5 ;
}
h2 {
font-size:20px;
font-weight:bold;
text-align:center;
}
</style>
</head>
<body>
<h2>HTML DRAG AND DROP DEMO</h2>
<div id = "box">
<div id="square1" draggable="true"ondragstart="dragStart(event)"></div>
<div id="square2" draggable="true"ondragstart="dragStart(event)"></div>
<div id="square3" ondrop="dragDrop(event)" ondragover="allowDrop(event)"></div>
</div>
</body>
</html>
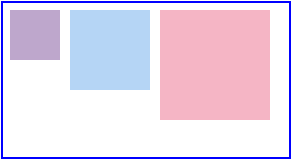
Output: Before drag and drop, option output will be as shown below:
After performing the Drag and Drop operation, the output will be as :

Example #2
Here we are going to see another example in which we will move the image from one location to another specified location as shown below code:
Code:
<!DOCTYPE HTML>
<html>
<head>
<script>
function allowDrop(ev) {
ev.preventDefault();
}
function dragStart(ev) {
ev.dataTransfer.setData("text", ev.target.id);
}
function dragDrop(ev) {
ev.preventDefault();
var data = ev.dataTransfer.getData("text");
ev.target.appendChild(document.getElementById(data));
}
</script>
<style>
.divfirst {
width: 250px;
height: 150px;
padding: 10px;
border: 1px solid black;
background-color: #F5F5F5;
}
p {
font-size:20px;
font-weight:bold;
}
</style>
</head>
<body>
<p>Image Drag and Drop Demo</p>
<div class="divfirst" ondrop="dragDrop(event)" ondragover="allowDrop(event)">
<img id="drag1"
src="Jerry.jpeg" draggable="true"
ondragstart="dragStart(event)" width="250" height="150"></div>
<br>
<div     class= "divfirst"ondrop="dragDrop(event)"
ondragover="allowDrop(event)"></div>
</body>
</html>
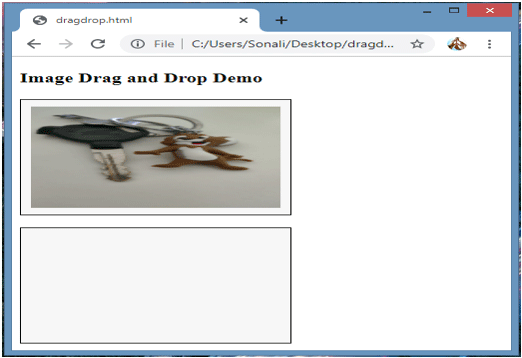
Output: Before drag and drop operation, the output is :
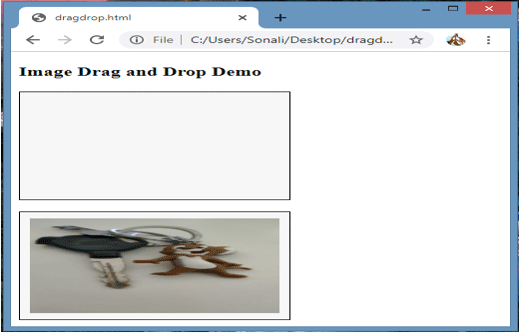
After the drag and drop operation completed, it will look like this:
Example #3
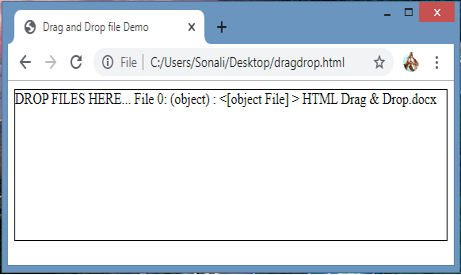
In this example, we are going to see how to drag and drop file at the specified location:
Code:
<body>
<div id="filedemo" style="min-height: 150px; border: 1px solid black;"
ondragenter="document.getElementById('output').textContent = ''; event.stopPropagation(); event.preventDefault();"
ondragover="event.stopPropagation(); event.preventDefault();"
ondrop="event.stopPropagation(); event.preventDefault();
dodrop(event);">
DROP FILES HERE...
</div>
<script>
function dodrop(event)
{
var dt = event.dataTransfer;
var files = dt.files;
for (var i = 0; i < files.length; i++) {
output(" File " + i + ":\n(" + (typeof files[i]) + ") : <" + files[i] + " > " +
files[i].name + " " );
}
}
function output(text)
{
document.getElementById("filedemo").textContent += text;
}
</script>
</body>
Output:
Conclusion
HTML drag and drop is one of the most important user interface entities that will use for different purposes like copying, deleting, or recording. It works on different events and attributes, as listed above. It performs the operation when you pick some object and then drop it at a specified location.
Recommended Articles
This is a guide to Drag and Drop in HTML. Here we discuss how exactly drag and drop operation will perform in HTML along with appropriate examples. You may also look at the following article to learn more –