Introduction to HTML Layout
While designing a web page, it is important that we arrange the web page elements in an elegant way. They should be easy to navigate for the user and simple. It provides a way to arrange these elements in a well-structured manner. It gives a very good look to the web page and provides an easy way to design as well. It is a simple way by which we can design web elements using simple standard HTML tags. HTML offers various layout elements by using which we can design various parts of the web page.
HTML Layout Elements
In this article, we will see different layout elements along with their examples. We will design a simple structure similar to the newspaper by using these elements.
1. <header>
This element is used to define the header of the web page. It contains the title of the page or some logo or maybe an introductory content.
Code:
<!DOCTYPE html>
<html>
<head>
<title> EduCba </title>
</head>
<body>
<header style = "height: 100px; width: 100%; background-color: #607D8B;" >
<h1 style=" color: #fff; text-align: center; padding-top: 25px; font-size: 30px;" > Header Section</h1>
</header>
</body>
</html>
Output:

2. <nav>
This element will contain links to the menu list. This element is like a container to different navigation links. The links will be on a different page or the same page.
Code:
Let us add a navigation element just below the header from our last example. Add <style> part into the <head> element and <nav> part just below the header section.
<head> Popular Course in this categoryHTML Training (12 Courses, 19+ Projects, 4 Quizzes)12 Online Courses | 19 Hands-on Projects | 89+ Hours | Verifiable Certificate of Completion | Lifetime Access | | 4 Quizzes with Solutions
<style>
li{
display: inline-flex;
padding: 25px
}
ul{
text-align: center;
}
</style>
</head>
<body>
<nav style = "background-color: #607d8b70;" >
<ul>
<li> <a href = "#"> Navigation Link1 </a> </li>
<li> <a href = "#"> Navigation Link2 </a> </li>
<li> <a href = "#"> Navigation Link3 </a> </li>
</ul>
</nav>
</body>
4.5 (6,492 ratings)Course Price
₹6999 ₹41999
View Course
Related CoursesBootstrap Training (2 Courses, 6+ Projects)XML Training (5 Courses, 6+ Projects)CSS Training (9 Courses, 9+ Projects)
Output:

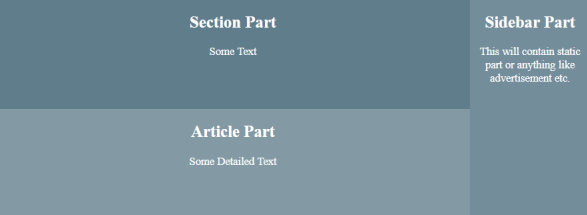
3. <section>
This element is like the main section of the web page. It can contain any kind of information. It can contain text, images, etc.
4. <article>
As the name suggests, this element will contain content like a paragraph, any detailed description of something or any kind of information. Generally, this will be the main part containing information on a web page.
5. <aside>
This element will define the content, which will at the side of the main content, like a section or article. This information element is optional and will generally hold additional information or advertisement content.
Code:
Let’s add all these three elements together below the navigation bar.
<style>
li { display: inline-flex;
padding: 25px
}
section{
background-color: #607D8B;
width: 79%;
position: absolute;
height: 150px;
}
article{
width: 79%;
background-color: #607d8b70;
position: absolute;
top: 368px;
height: 150px;
}
aside{
background-color: #607d8b99;
width: 20%;
position: absolute;
left: 80%;
height: 300px;
}
h2 , p {
text-align: center;
color: #9c27b0;
}
ul{
text-align: center;
}
</style>
<body>
<div class = "main" >
<section>
<h2> Section Part </h2>
<p> Some Text </p>
</section>
<article>
<h2> Article Part </h2>
<p> Some Detailed Text </p>
</article>
<aside>
<h2> Sidebar Part </h2>
<p> This will contain static part or anything like advertisement etc. </p>
</aside>
</div>
</body>
Output:
6. <details>
This element is used to display extra details about the web page to the user. This may contain additional information which is optional for the user. This element, by default, provides a feature to show or hide details upon clicking.
7. <summary>
This element is used along with the <details> element. The information which is to be hidden and will be shown upon click will be in this tag. This element will be inside the details element.
Code:
Let us add details elements along with the summary element in our existing example. Just add the below code after our aside, section and article element parts in the <body> tag.
<body>
<details>
<summary> Summary: click here to show details</summary>
<p> Details: Upon clicking summary element, details will be shown to the user </p>
</details>
</body>
<style>
details {
margin-top: 330px;
width: 100%;
padding-top: 10px;
padding-bottom: 50px;
padding-left: 15px;
background-color: #607d8bdb;
}
details p {
font-size: 18px;
}
summary {
color: white;
font-size: 22px;
}
</style>
Output1: Without clicking on the details element.

Output2: After clicking on the details element.

8. <footer>
There will be one section at the bottom part of every web page, which is known as a footer. This <footer> element is used to define the footer section at the bottom of the web page. The footer section will generally contain information like copyrights, year, contact information, etc. It’s a standard practice to have a footer in the web pages, and it will be at the bottom part of a web page.
Code:
Let us add-footer on our web page at the bottom part.
<footer style = " height: 100px; background-color:#607D8B; width: 100%; text-align: center;">
<h3 style = " color: #fff; text-align: center; padding-top: 10px; font-size: 30px; " >Footer Section</h3>
<p> © Copyright ( Year ) </p>
</footer>
Output:

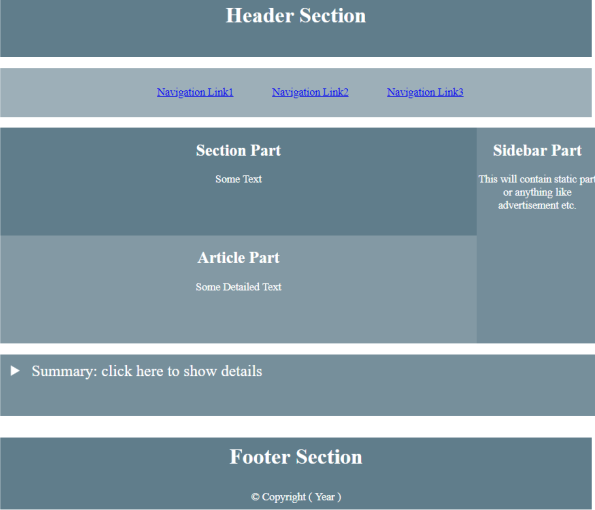
So our final code and its output will look like this,
Code:
<!DOCTYPE html>
<html>
<head>
<title> EduCba </title>
<style>
li{ display: inline-flex;
padding: 25px
}
section{
background-color: #607D8B;
width: 79%;
position: absolute;
height: 150px;
}
article{
width: 79%;
background-color: #607d8bc7;
position: absolute;
top: 368px;
height: 150px;
}
aside{
background-color: #607d8bde;
width: 20%;
position: absolute;
left: 80%;
height: 300px;
}
h2 , p {
text-align: center;
color: #fff;
}
ul{
text-align: center;
}
details {
margin-top: 330px;
width: 100%;
padding-top: 10px;
padding-bottom: 50px;
padding-left: 15px;
background-color: #607d8bdb;
}
details p {
font-size: 18px;
}
summary {
color: white;
font-size: 22px;
}
</style>
</head>
<body>
<header style = "height: 100px; width: 100%; background-color: #607D8B;" >
<h1 style=" color: #fff; text-align: center; padding-top: 25px; font-size: 30px;" > Header Section </h1>
</header>
<nav style = "background-color: #607d8b9c;" >
<ul>
<li> <a href = "#"> Navigation Link1 </a> </li>
<li> <a href = "#"> Navigation Link2 </a> </li>
<li> <a href = "#"> Navigation Link3 </a> </li>
</ul>
</nav>
<div class = "main">
<section>
<h2> Section Part </h2>
<p> Some Text </p>
</section>
<article>
<h2> Article Part</h2>
<p> Some Detailed Text </p>
</article>
<aside>
<h2> Sidebar Part </h2>
<p> This will contain static part or anything like advertisement etc. </p>
</aside>
</div>
<details>
<summary> Summary: click here to show details </summary>
<p> Details: Upon clicking summary element, details will be shown to the user </p>
</details>
<footer style = " height: 100px; background-color:#607D8B; width: 100%; text-align: center;">
<h3 style = " color: #fff; text-align: center; padding-top: 10px; font-size: 30px; " >Footer Section</h3>
<p> © Copyright ( Year ) </p>
</footer>
</body>
</html>
Output:
Conclusion
So HTML layout elements are very much useful while designing the web page. They help developers to design well-structured web pages. Using these layout elements properly improves the reading experience of web pages. We have seen most of all the main HTML layout elements in detail.
Recommended Articles
This is a guide to HTML Layout. Here we discuss HTML Layout Element with the example, codes and outputs in detail. You can also go through our other related articles to learn more –