

Introduction to Datalist in HTML
This article provides an outline to datalist in HTML. Datalist is a tag available in HTML5, which is used to autosuggest the input values to the user. This tag is the HTML5 feature that makes the input element more interactive and the user interfaces intuitive. The <datalist> tag is used along with the input element tag. It is used to display the values, which are possible while typing into the input box. The user will have the freedom to enter any value into the input box; just the datalist tag will provide the autosuggestion values. Therefore, the user will have more flexibility to enter the value and with great ease.
Syntax:
<input list = "xyz" name = "input name" >
<datalist id = "xyz" >
<option value = " . . . " >
<option value = " . . . " >
<option value = " . . . " >
<option value = " . . . " >
</datalist>
Here, we have two main tags; one is the <input> tag and the second is the <datalist> tag. The datalist tag starts with start tag <datalist> and ends with end tag </datalist>. All the options are enclosed in between datalist tag. We have assigned an id to the datalist tag (xyz here), and this same id value is passed to the list attribute in the input tag. Therefore, both the tags are linked by the same id. Now that they are linked, we want to display or auto-suggest the list of values. These values are then added by using the <option> tag. Here we have options as a list of four with value as dots. The list can contain any number of options as required.
The option tag is the same as which is used with the select tag. Note the difference between the select tag and the datalist tag. The select tag allows choosing a value from only available options, while the datalist tag just suggests the values from the list. The name attribute is used to only identify the input element in the example.
Attributes:
There are no as such special attributes available with the <datalist> tag; by default, it supports the globally available Event and HTML attributes.
Examples of Datalist Tag in HTML
Given below are the examples:
Example #1
Let’s design a simple input field with autosuggestion options as follows:
Code:
<! DOCTYPE html>
<html>
<body>
<label> Car Brand: </label>
<input list = "car_brands" name = "car brand" >
<datalist id = "car_brands" >
<option value = "Honda " >
<option value = "Hyundai " >
<option value = "Toyota " >
<option value = "Volkswagen " >
<option value = "Ford " >
<option value = "Mazda " >
<option value = "Chevrolet " >
<option value = "Kia " >
</datalist>
</body>
</html>
Here, we have an input element as a car brand. In the autosuggestion to be displayed, we have listed in options tag. For the datalist tag, we have assigned the id as car_brands, and the same is passed to the input element. When the user clicks in the userbox or the user start typing, the HTML will automatically popup with the auto-suggested values as above. Popular Course in this categoryHTML Training (12 Courses, 19+ Projects, 4 Quizzes)12 Online Courses | 19 Hands-on Projects | 89+ Hours | Verifiable Certificate of Completion | Lifetime Access | | 4 Quizzes with Solutions
4.5 (6,492 ratings)Course Price
₹6999 ₹41999
View Course
Related CoursesBootstrap Training (2 Courses, 6+ Projects)XML Training (5 Courses, 6+ Projects)CSS Training (9 Courses, 9+ Projects)
Output:
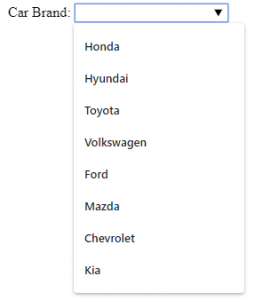
In the output, upon clicking in the input box, the list of car brands will display like above.
Example #2
The datalist tag will be used mostly in the case of form submission. Let’s see an example with the form embedded in it.
Code:
<!DOCTYPE html>
<html>
<body>
<form action = "#" method = "get" >
<label> Car Brand: </label>
<input list = "car_brands" name = "car brand" >
<datalist id = "car_brands" >
<option value = "Honda " >
<option value = "Hyundai " >
<option value = "Toyota " >
<option value = "Volkswagen " >
<option value = "Ford " >
<option value = "Mazda " >
<option value = "Chevrolet " >
<option value = "Kia " >
</datalist>
<input type = "submit" >
</form>
</body>
</html>
Output:
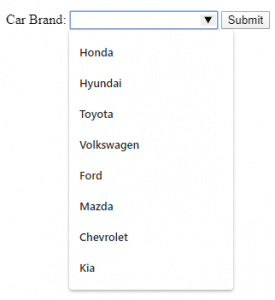
Here, in the output note, we have moved the input element into the form element and added the submit button.
Example #3
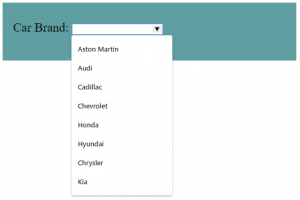
The datalist autosuggestion will try to show the best match as much as possible. When the user starts typing, the suggestions will be filtered out depending upon the value entered by the user. Let’s modify the first example to display this feature along with some styling of the input element.
Code:
<!DOCTYPE html>
<html>
<head>
<style>
.cars {
height: 110px;
background-color: cadetblue;
width: 100%;
}
</style>
</head>
<body>
<div class = "cars" >
<label style = "font-size: x-large; font-weight: 500; margin-left: 20px " > Car Brand: </label >
<input list = "car_brands" name = "car brand" style = "margin-top: 40px; " >
<datalist id = "car_brands" >
<option value = "Aston Martin " >
<option value = "Audi " >
<option value = "Cadillac " >
<option value = "Chevrolet " >
<option value = "Honda " >
<option value = "Hyundai " >
<option value = "Chrysler " >
<option value = "Kia " >
</datalist>
</div>
</body>
</html>
Output without user’s typing:
Output when a user starts typing:
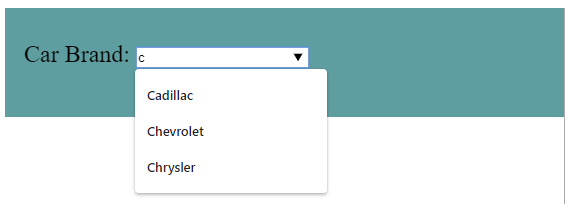
Here as a user has entered the value ‘c’ in the input box, the HTML is showing all the auto-suggestion values starting from character ‘c’. We have also modified the option elements to display the feature, which will autosuggest depending upon the alphabets.Note: Almost all the browsers support the data list tag except the Internet Explorer 9 and Safari 12.0 and earlier versions of both. Keep this in mind while using the datalist tag.
Conclusion
The autosuggestions while getting input from the user is the feature provided in HTML5. The datalist tag is used to achieve this feature. The datalist tag is generally used along with the input tag.
Recommended Articles
This has been a guide to Datalist in HTML? Here we discuss the introduction, attributes and various examples of datalist in HTML. you may also have a look at the following articles to learn more –